ŌĆó┬┤┬»`ŌĆó┬╗ ╬ĘŽā╬╣s╬Ą & ęōŌäō╬▒ą║╬Ąs gŌäō╬╣čéčé╬ĄčÅęō╬╣ŌäōŌäō ┬½ŌĆó┬┤┬»`ŌĆó
This tutorial was created with PSP 8 and Animation Shop 3. However, you may still incorporate these steps into other versions (though the features may be named and/or placed differently).
Here's what we're going to make:
A noise and glitter flake fill.

What you will need:
Elsa of Glitters Galore's glitter flakes. Shown here with a border for page purposes only. Right-click and save to your computer.

You may not sell any creations you make with this glitter flake.
STEP 1
Open the glitter flakes in Animation Shop (AS) and select all three frames by going to Edit > Select All (or ctrl+A), then back to Edit > Copy (or ctrl+C or right-click on any of the frames and select Copy) to copy the selected frames.
STEP 2
Go to PSP and paste them by going to Edit > Paste > AS Animation as Multiple Images (or right-click anywhere in PSP's workspace and select AS Animation as Multiple Images).

STEP 3
Open a new canvas by going to File > New. Use the dimensions of 60 width and 30 height (60x30) or to any size of your choice.
Optional settings:
Raster Background
Color depth: 16 Million Colors
Transparent
STEP 4
Using the Flood Fill tool ( ), fill in your canvas with the color, gradient or pattern of your choice from the Materials palette. I used the color #B10505. To change the color, gradient or pattern, click the Foreground and Stroke Properties box and select the appropriate tab.

STEP 5
Now go to Adjust > Add/Remove Noise and select Add Noise.

Adjust the settings to Gaussian, 40% (or to your # of preference), Monochrome.
You can choose either noise setting (Random, Uniform or Gaussian) and/or select Monochrome. It's really just a matter of preference. Click OK when you're done adjusting.
STEP 6
You will now create a new layer on the freshly "noised" fill. Go to Layers > New Raster Layer (or in the Layers palette, click  or you can also right-click on the "noised" fill layer in palette and select New Raster Layer).
STEP 7
Click on the Foreground and Stoke Properties box. In the Material window, select the Pattern tab and look for the first glitter flakes frame.
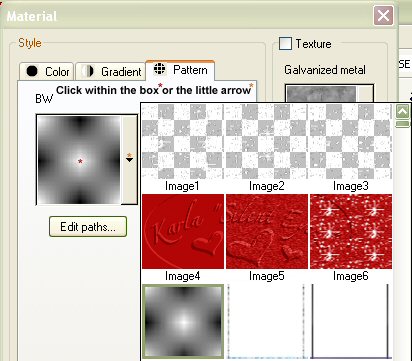
STEP 8
Now that you have selected the first glitter flake frame, you will Flood Fill the new layer you created.

Shown in stages (Steps 4 - 8).
Next, copy all layers by going to Edit > Copy Merged (or ctrl+shift+C).
STEP 9
Go to Animation Shop (AS) and paste them by going to Edit > Paste > As New Animation (or press ctrl+V in AS's workspace).
STEP 10
Go back to PSP and go to Edit > Undo Fill (or press ctrl+Z once to undo last step, or you can press ctrl+X to clear layer, or you can also press the delete key to clear). You are just going to undo the glitter flake fill from Step 8.
STEP 11
Repeat Step 7, only this time you will select the second glitter flake fill to Flood Fill the top layer. Next, copy all layers by going to Edit > Copy Merged (or ctrl+shift+C).
STEP 12
Go back to AS and go to Edit > Paste > After Current Frame (or press ctrl+shift+L).
If you'd like to see your glitterfill in action (animated), to see how things are coming along, go to View > Animation. This will open a new window showing your animation.
STEP 13
Repeat Step 10 (or press ctrl+Z once) to clear the glitter flakes fill and repeat Step 11, this time selecting the third and final glitter flakes frame from the Pattern tab.
STEP 14
Repeat Step 12. If you haven't already selected to view your animation in action, do so now. You'll want to make sure things are looking good before saving your glitterfill. By default, AS sets the animations to a speed of 10. This is perfect for glitterfills.
If you'd like to change the speed of yours, select all frames (following the process in Step 1), then go to Animation > Frame Properties (or right-click on any of the selected frames and select Frame Properties or press alt+enter). A window will open, in which you will be able to adjust the speed settings (Display Time).
Need to change some things? Then just go back and follow the previous steps and do some adjustments until you get things looking the way you like. Once you're done, save your glitterfill and voila!
Here are some variations you can try out!
Noise:

Following my "noise fill" tutorial, use the adjustments of 40% for first frame, 50% for second frame and 60% for third frame (or any %s of your choice).
Pattern Noise Fill:

Pattern used is Liquid Gold.
You don't have to use the noise effect for your fills if you do not wish to, so feel free to create as your heart desires.
Note:
You may use any pixel fill of your choice for this tutorial, you are not limited to just the glitterflakes. Just adjust any settings you may need. For example, canvas (file) size, number of frames fill has, blend modes (if using Screenfills) etc.
Colorization:
To recolor, open your glitterfill in AS and follow Step 1 to select and copy all frames. To make things easier, press ctrl+V anywhere in PSP's workspace to paste them. They will be shown as one image but will have all three frames as layers. By default, top layer shown is frame 3, followed by frame 2 and bottom is frame 1 (in the layers palette, all are titled Frame 1).
Next, click on the top layer frame. Go go to Adjust > Hue and Saturation > Colorize (or press shift+L). This will open a window, in which you will be able to adjust the Hue and Saturation. Play around with the settings and have fun.
Copy and paste each frame layer, one by one, instead of copying all layers together. Just click on a single layer and press ctrl+C. Paste them to AS following the steps in this tutorial.
Here's what I get when I recolor my red glitterfill and select the settings of 205 Hue / 255 Saturation:

You can also go to Adjust > Hue and Saturation > Hue/Saturation/Lightness (or press shift+H) and make color adjustments in the new window. Here's what I get when I recolor my red glitterfill and select the settings of Master, Hue 22, Saturation 0, Lightness 2:

If the colors look too dull, bright or dark, you can enhance the coloring. Click Enhance Photo > Automatic Saturation Enhancement. Play around with the Bias, Strength, and Skintone settings. I do this with all of my creations to make the colors stand out. Have fun colorizing!
This tutorial was created by me and should not be reposted, zipped or shared anywhere without my consent. Tutorial was revised on May 20th, 2009.